Tuesday, July 6, 2010

Great Hair Care Tips

hair_care1
Keep Brushing

Brush often to stimulate the scalp. Brushing enables sebaceous glands to secrete oil that is good to keep hair growing and shiny. So keep brushing at least 3-4 times a day.
Wash Shampoo Properly
Wash shampoo out from your hair properly. Since the hair develops rough the roots, take care of the scalp by washing properly with shampoo, rising thoroughly.
Keep Dandruff Away
Dandruffs are loose dead surface skin of the scalp cause by allergy to shampoo and infrequent washing. It develops mostly in dead scalp. So look for medicated shampoos intended to eliminate dandruffs.
Avoid Too Much Shampoo
Avoid too much shampoo. Not everyday as this can strip your hair with natural oil.
Use Hot Oil
Massage hot oil in your hair once in a week. It will make your hair strong and healthy.If you have dry hair then oil it twice a week. Hair oil gives the necessary moisturizers to your hair. Herbal hair oil provides you the necessary nourishment along with the moisturizers.
Dry Hair Pack
Add some ilk, water and 2 egg yolks in henna. This mixture will not dry your hair and will make it soft and manageable. Apply it monthly.
Normal To Oily Hair Pack
Add water, lemon, egg yolks in henna. You can apply henna fortnightly.
Home Made Conditioner
Add 1/4 cup of vinegar in 1/2 bucket of water. This will give shine to your hair. Mix curds and egg yolks together and apply it for 1 hour.

Cleansing Hair Properly

http://i.ehow.com/images/a04/q7/cg/wash-hair-properly-200X200.jpg
It may seem like it is something simple to do. You clean your hair all the time. The question you should be asking yourself is: Am I cleaning it properly? There actually is a correct and incorrect way to cleanse your hair.

To begin, you need to have the proper supplies. You will need a towel to dry your hair. You will need a place to get your hair wet, also known as a tub, shower, sink, bucket, or body of water. You will need a cleansing agent such as a hair cleansing bar or shampoo. And finally, you will need a head of hair to cleanse. That last one is important!

You need to read the directions for the cleanser you will be using on your hair. In this case, I will be using the example of a professional shampoo. The directions say to apply a small amount to damp hair and massage in. Some may wonder what a small amount is. This is always a point of contention because every person’s idea of small is different. We will use United States coin money as our gauge to better understand sizing for this article. Small for our purposes will be a US quarter.

To start the cleansing process you will need to get your head of hair wet. Temperature doesn’t really matter, but to get a better cleansing action, warm water is better. After you have wet the hair, remove excess water with your hands. Too much water will dilute your cleanser before it is worked into the scalp. After your hair is damp to wet, apply a quarter size amount of your cleansing agent to your hand. Spread the cleanser between your two hands to evenly distribute it. Using both hands, start working the cleanser into your hair starting at the scalp and working outward. It is NOT important that you get cleanser to your ends because during the massaging process you will get enough cleanser on your hair ends to facilitate cleaning. Using the pads of your finger (not the fingertips) massage the cleanser in a circular motion into your scalp and hair. Continue to do this until you have massages thoroughly the whole head. Depending on your cleanser and its ingredients, you may or may not get a lot of lather. This is just fine. Now, you will rinse the hair. Under warm water, thoroughly rinse the cleanser out of your hair.

Most cleansers will tell you to rinse and repeat. This step is actually important to get a full cleansing of the hair. Your first cleansing will get rid of the surface oils and dirt, while the second cleansing will fully clean the scalp and hair to ensure that all excess oil and dirt are removed. For your second cleansing you will need only a dime size amount of cleanser. Just as before, spread the cleanser between your two hands and apply to the hair. Using the pads of your fingers, massage the scalp and hair working across the whole head. Once complete, rinse your hair using warm water. You can then move on to conditioning you hair (which is another article in of itself).

This is a general procedure to cleanse the hair. If you have more hair, thick hair, coarse hair, you may need to use more than a quarter size amount of cleanser. If you hair is also oiler than “normal”, you may need to use more than a quarter size amount of cleanser. The general rule of thumb is to use 35 cents worth of cleanser. Start with a quarter, and add a dime size amount if you need more. The first cleansing won’t lather that much, but your second one will.

If you have any question or comments on this hair topic or another, join us in the hair forums or contact the editor by clicking the appropriate button below or next to this article.

Shampoo - The Beginning of a Style

Beautiful hair begins with choosing the right shampoo. Shampoo that is the correct formula for your particular texture of hair can make the difference between a plain ordinary 'do' and fabulous hair.

The proper shampoo will lay the groundwork for everything else you put on your hair, helping it to work together to create and keep the style you've always wanted.

Just as there are different textures and conditions of hair, there are different types and qualities of shampoo. Certain types of shampoo will have ingredients that are perfect for your particular texture of hair and will improve its manageability and appearance while others will be detrimental to styling and even to the condition.

That’s why I want to tell you about LC Legacy Shampoo.
This shampoo has been carefully formulated to make your hair more manageable and easy to care for. It is made from only the highest-grade ingredients.

It is balanced at a PH of 5.1, to maintain the shine and firmness of your hair. This in turn improves the look of your hair color and produces better highlights.
Both of the following LC Legacy Shampoos have a light almond scent and a very creamy consistence that make using them an enjoyable experience.

Is your hair fine to medium in texture and not damaged by hair color or other chemical treatments?
I suggest LC Legacy Daily Shampoo. It is a good cleansing shampoo, containing 3 cleansers to work for different types of build-up.
Yet, it is more than a cleanser.
With regular use, it improves and strengthens your hair.
Daily Shampoo contains Apricot Oil and Hydrolyzed Wheat Protein to help to condition your hair and your scalp while still maintaining body and bounce.

It is economical. Daily Shampoo is twice as concentrated as most shampoo on the market, making it cost literally pennies per shampoo. (It has been proven that it is possible to get up to 120 shampoos from one 8 ounce bottle.)

Is you hair medium to coarse, curly or damaged through chemical processes, heat styling, sun or other environmental conditions?
LC Legacy Moisturizing Shampoo is the one for you. It contains a larger portion of Hydrolyzed Wheat Protein , Apricot Oil and Moisturizers, giving even weak, frizzy, dry hair more strength and more shine. Repeated use continues to improve the condition of your hair. The more you use it, the better your hair look.

This shampoo is also extremely concentrated, making it very economical to use.

So get the best start possible for your hair care. Carefully choose a shampoo that will improve your hair in texture and appearance as well as cleanse it. This is the first step in creating the hairstyle you've always wanted.

Note: My hair is naturally curly and color treated so it is on the dry side and tends to frizz. I use LC Legacy Moisturizing Shampoo on a regular basis. However, when I use alot of hair wax or serum, I use Daily Shampoo to remove the build-up and then go back to the Moisturizing Shampoo. I do this about every 3 or 4 shampoos.

Shampoo

http://mocoloco.com/art/archives/shampoo_apr_05.jpg
I have previously discussed how to grow healthy hair from the inside. Now lets look at what it takes on the outside to keep your hair looking like the shiny mane you desire.
The cuticle is the outer layer of the hair shaft that protects the inside of the hair. It is made up of tiny scales that look like shingles on a roof with each scale overlapping the next. It should lie flat to offer protection and to reflect the light.

Starting with the basics, shampooing is the first step. I recommend using only soft water on your hair since hard water will leave mineral deposits behind that will coat and dull the appearance. Hair has to be clean to be shiny. Each hair has its own oil gland to keep it lubricated; unfortunately, the oil causes dirt to stick to the hair. It will take a soap or detergent product to wash away this build-up. Years ago, soap was used. A drawback to soap is that it may leave behind calcium and magnesium deposits known as soap scum. This is why Grandma used to follow a shampoo with a lemon or vinegar rinse. The acid dissolved the soap scum and caused the cuticle to lie flat making her hair shiny and smooth.
The first ingredient in most shampoo now is detergent, which sounds like harsh treatment for our treasured tresses, but it tends to be a better choice for cleansing. Soap solutions are alkaline which cause the cuticle layer of the hair to swell, feel rough and appear dull.

Lathering agents are normally included. Sudsing isn’t necessary but it makes us feel better about the cleansing ability of the shampoo.

There may be many other ingredients in your bottle of shampoo; everything from vitamins to herbs to additives with long unpronounceable names.

You will find shampoos that claim to volumize, thicken, or smooth your hair. Each has its own ingredient to accomplish the purpose. Volumizers contain ingredients that will plump up the hair shaft slightly and will increase the volume a small amount. Thickening shampoo coats the hair shaft to cause the hair to feel thicker. Smoothing shampoo contains moisturizers and emollients to decrease frizzyness.

Clarifying shampoos remove build up from styling products. They are extra cleansing and can be used about once a week to remove any build-up that dulls and weighs the hair down.

There are even rapid dry shampoos for those pressed for time. These either coat the hair with polymers that helps the water to drip off and evaporate faster than normal or contain ingredients that cause the hair’s cuticle to lock down flat, which minimizes water absorption. These shampoos can cause the hair to dry up to twice as fast.

Read the ingredient list on your shampoo bottle. While a long list of ingredients does not make the product of higher quality, there are some added ingredients such as herbal extracts you may want to try. I have compiled a list of common and some not so common additives along with their purpose to help you make an informed choice. Take it along the next time you shop for a new shampoo.

How Often to Shampoo

http://www.cultbeauty.co.uk/wordpress/wp-content/uploads/hairwash.jpg

    How often should you wash your hair? That is a good question. And the answer is – it depends.
  • Is your hair and scalp oily?
    If you produce a lot of natural oil in your hair, you will probably prefer to shampoo your hair at least once a day or even twice a day if you happen to go to the gym in the afternoon. Use a shampoo that has good cleansing properties but one that is also gentle so that the ends of your hair don’t become dehydrated. Always use a conditioner.

    If your scalp is oily, it is a natural response to scrub it vigorously in order to get rid of the oil. In actuality, it is better to be very gentle in the massage of your head. Vigorous scrubbing will activate oil glands, thus producing even more oil.
  • Is your hair and scalp dry?
    If your scalp and hair tend to be dry, shampoo no more than every other day. If possible, go even longer between shampoos. Use a gentle shampoo and conditioner. Massage your scalp with both the application of the shampoo and the conditioner. This will help to stimulate oil glands and will moisturize the scalp with the conditioner.
  • Is your hair and scalp in normal condition?
    You may choose to shampoo your hair every day but it is usually not necessary. Shampoo as necessary to keep your hair shiny and clean feeling.

    If you do not have oily scalp or hair but your hair feels dirty or weighed down after one day, look into the conditioner and the styling products that you are using on your hair.

    Your conditioner should not build up on your hair. It should moisturize, rinse out easily and then leave your hair feeling clean, with no waxy build up. There are many good quality styling products that do not build up on your hair and do not dull the shine. You should be able to go at least two days between shampoos with these products.
Should you change brands of shampoo every few weeks?
Does your hair become “immune” to a shampoo or conditioner? No, it is not necessary to change products every so often. Your hair does not build up a resistance to a particular product. What may happen, with some shampoo or more often conditioners, is that they will leave a coating on the hair after rinsing. This coating detangles your hair and leaves it feeling sleek. This is not such a bad thing – unless the coating does not come off with the next shampoo. Sometimes a waxy coating will stay on your hair and build up with each use. This build up, weighing down your hair and dulling the shine, is what you are experiencing when you feel that it is time to change products.

Choose products that do not build up on your hair. If you use a good quality shampoo and conditioner, your hair should stay in good condition, maintaining its body and shine no matter how long you use a particular product. High quality shampoo and conditioner should be just as good for your hair in five years as it is today

Homemade Hair Conditioner

http://www.ebayhairpage.com/hair%20Brr.jpg
If you are disenchanted with store bought hair conditioners or just looking for products that you know exactly what the ingredients are, you can make your own. Some hair conditioners are as close as your refrigerator. The following are a few of the homemade hair conditioners that have been suggested.
  • Mayonnaise is used to soften and shine dry hair. This is real mayonnaise, not salad dressing. Before you shampoo, comb about a quarter sized portion of through your hair. Make sure all the strands are coated. Leave it on for about 30 minutes and then shampoo it out with your regular shampoo. For a deeper conditioning treatment, apply the mayonnaise and cover it with plastic wrap or a shower cap. Leave this on for a longer amount of time or even over night before shampooing.
  • Avocado is a natural moisturizer. Mash an avocado. Mix in one egg yolk and a half teaspoon of olive oil. Leave this mixture on your hair for at least 30 minutes and then shampoo it out.
  • Eggs have been used for centuries as a hair conditioner. This treatment is a bit slimy but many people love it. Beat together two or three eggs. After your shampoo, massage the eggs through your hair. Leave it on for about 30 minutes and then rinse thoroughly. Rinse with cool water, not hot.
  • Jojoba oil, olive oil, or coconut oil are suggested as conditioners. Massage the oil into your scalp and hair, cover with a shower cap and leave it overnight.
  • Beer is another seasoned hair conditioner. Shampoo your hair as usual. Poor a cup of beer through your hair and massage it in. Rinse with cold water.
  • Vinegar is used as a rinse to remove soap and other product residue. Put a tablespoon of vinegar into a cup of warm water and poor it through your hair after your shampoo. The acidic rinse is healing for an itchy scalp and may help with dandruff. You may also massage full strength apple cider vinegar into your scalp before shampooing.

As a professional who has worked with all types of hair for many years, I must give this disclaimer. These natural conditioners may be satisfactory on hair that is in its natural state or gently color enhanced. They are beneficial for lubricating and moisturizing hair and scalp. However the protein molecules are too large to effectively recondition damaged hair. If your hair is fragile, color treated with more than one application of hair color or if it is lightened, I suggest using professional conditioners that are formulated to rebuild and strengthen the hair shaft.

Conditioning your hair properly


It may seem like it is something simple to do. You condition your hair all the time. The question you should be asking yourself is: Am I conditioning it properly? There actually is a correct and incorrect way to condition your hair.

To begin, you need to have the proper supplies. You will need a towel to dry your hair. You will need a place to get your hair wet, also known as a tub, shower, sink, bucket, or body of water. You will need a conditioning agent such as a hair conditioning bar, a conditioning butter, a natural oil, or Conditioner. And finally, you will need a head of hair to condition. That last one is important!

You need to read the directions for the conditioner you will be using on your hair. In this case, I will be using the example of a professional conditioner. The directions say to apply a small amount to damp hair after cleansing and massage in. Some may wonder what a small amount is. This is always a point of contention because every person’s idea of small is different. We will use United States coin money as our gauge to better understand sizing for this article. Small for our purposes will be a US quarter.

To start the conditioning process you will need to get your head of hair wet and cleanse it. If you are unsure how to cleanse your hair, be sure to check out my previous article on Properly Cleaning Hair. Water temperature doesn’t really matter at this point, but to get a better cleansing action, and therefore a better conditioning action, warm water is better. After you have wet the hair, remove excess water with your hands. Too much water will dilute your conditioner before it is worked into the scalp. After your hair is damp to wet, apply a quarter size amount of your conditioner to your hand. Spread the conditioner between your two hands to evenly distribute it. Using both hands, start working the conditioner into your hair starting at the ends and working upward. It is NOT important that you get conditioner to your scalp because during the massaging process you will get enough conditioner on your scalp to moisturize and not overdo it. Using the pads of your finger (not the fingertips) massage the conditioner in a circular motion into your scalp and hair. Continue to do this until you have massages thoroughly the whole head. Now, you will rinse the hair. Under lukewarm to cool water, thoroughly rinse the conditioner out of your hair. It is important not to use overly warm to hot water to rinse conditioner out of your hair. This will keep the cuticle of your hair open and allow those moisturizing agents to escape, and thus defeat the purpose of the conditioner in the first place.

This is a general procedure to condition the hair. If you have more hair, thick hair, coarse hair, you may need to use more than a quarter size amount of conditioner. If you hair is also oilier than “normal”, you may need to use less than a quarter size amount of conditioner and make sure to keep it off the scalp as much as possible. The general rule of thumb is to use 25 cents worth of conditioner. Start with a quarter, and add a dime size amount if you need more. It is better to have to add a little more than overuse and waste your conditioner that you paid good money for. Air drying the hair and not using a brush on wet hair will result in a nice smoother, less damaged, and shinier hair.

If you have any question or comments on this hair topic or another, join us in the hair forums or contact the editor by clicking the appropriate button below or next to this article.

Conditioners for Beautiful Hair

http://a.images.blip.tv/Fordmodelsbeauty-YarasChoiceForBeautifulHair442.jpg
Great hair is shiny, soft, silky, manageable, free of static and tangles and has lots of body and bounce. Conditioners are designed to help produce these attributes in your hair, but the trick is to choose one that suits your hair’s individual characteristics and needs.

Lets talk about some of the different attributes of a conditioner.
    PH
  • The PH of anything deals with whether it is acidic or alkaline. A conditioner should lower (more acidic) the PH of your hair. Shampooing, perms, color and other such things cause your hair have a more alkaline quality, often resulting in a dull appearance and weakened condition. A lower PH (acidic) will increase your hair’s shine, reduce static and strengthen your hair.

  • Moisturizer
  • Moisturizers soften, smooth and improve the feel of your hair. They are also designed to seal in your hair’s natural moisture. Moisturizers come in different forms or grades. Light- low softening that will not weight-down fine hair. Heavy-high softening that will soften coarse hair and make it more flexible.

  • Protein
  • Any kind of abuse, such as permanent waves, hair color, sun, wind, blow-drying and heat curling can break down the natural protein in your hair. If you put a damaged strand of hair under a microscope, you can actually see little "pot-holes" in it. Protein in conditioners should be "hydrolyzed" in order to change it into a form that will penetrate the hair and fill in the "pot-holes" thus improving the texture, appearance and strength.


Lets talk about your hair
If you have fine, limp hair you may be afraid to use conditioner for fear of over-softening it. However, it does need a conditioner. Look for one that is designed specifically for fine hair. This will fulfill your hair’s conditioning requirements with very low softening. When you use it, be sure to rinse it out thoroughly. If you still feel that your hair becomes too soft, try applying conditioner to the ends only.

If your hair is coarse or wiry it will be most manageable when a moisturizing conditioner is used. The stronger moisturizing properties will improve the flexibility of your hair and give it a softer, more nourished look and feel.

Very curly hair often needs a moisturizing conditioner for control and to reduce frizz.

Medium textured hair (not fine or coarse) will always do well with a conditioner designed for fine hair but may sometimes be more manageable with moisturizing conditioner, especially if it is dry or damaged.

Conditioner For Fine Limp Hair


I’ve been looking for great products that work well for fine limp hair, so I road-tested Bliss by Nioxin Research Laboratories.
The literature describes it as a leave-in conditioner that provides superior thermal and UV light protection. It increases the strength and helps to repair split ends. It repairs hair damage without over-softening or leaving behind any build up that would flatten the hair.
Those of you who have fine, limp hair know that many leave-in products tend to be too heavy for your hair. I wanted to see what this product would do. I found a woman who had what many call ‘baby-fine’ hair. Her hair was very fragile and highlighted with some breakage caused by using the curling iron.

After shampooing her hair, I sprayed on a liberal amount of Bliss and combed it through. It smelled wonderful and removed the tangles that were caused by the damage. I left it in and after I had applied styling foam, dried, and styled her hair, I noticed that the Bliss had not added any weight. Her fine hair was not oily feeling and was still shiny, full and fluffy. After finishing the style, I was very pleased with the result.

How would Bliss rate with continued use?
My client was pleased with the effect in the salon so she took a bottle of Bliss home and promised to use it daily. Six weeks later, she arrived for her haircut and style. I noticed that her hair appeared to be in good condition, not perfect but better than when it was previously. She promised to continue use. Another six weeks passed and she arrived for her appointment. This time I could see that the Bliss was making a difference in her hair. There was no additional breakage and what she had before was growing out nicely. As I highlighted and trimmed her hair I could feel that it was stronger and healthier. She reported that her hair was behaving well and styling it was easier. Since that time, her hair has continued to improve.

I like Bliss for any type of hair. But, if you have that fine limp hair that makes you afraid to use conditioner on it, Bliss is a must have. This is a product that understands your hair.

The Labret, or Lip Piercing

http://z.hubpages.com/u/62632_f520.jpg
One of the more unusual piercings, both in ancient and modern practice, is the labret, or lip piercing. The term “labret” is Latin in origin, from labrum meaning “lip” and is pronounced "lah-bret." It is the modern, umbrella term for all piercings around the opening of the mouth. Primitive and contemporary piercings are found in both the upper and lower lips in a variety of thicknesses and placements.

labret and medusa piercingsIn the past, the mention of a lip piercing brought to mind exotic Africa and large wooden disks. Many people probably now imagine any number of dark-clad young people with silver lip and nose rings who work at the corner store or are their own children. In essence, these two ends are achieved through nearly the same means, but in each case the person is operating under different cultural norms and treats the piercing differently during healing.

Placement of lip piercings can vary quite a bit, and often jewelry choice is related to the location and size of the piercing. Lower lip piercings can be centered or placed as desired almost anywhere along the lower lip line. Rings are frequently worn for lower lip piercings, but curved tusks, short spikes and studs can be worn if desired.

Upper lip piercings frequently are “beauty mark” style, sometimes called a Madonna piercing, after the singer’s beauty mark. A tiny barbell or stud is most often worn in upper lip piercings, to make the piercing most resemble the namesake beauty mark placement. More often the style of backing chosen for post-style jewelry becomes more important than the part that shows outside the mouth.

This is a piercing that should never be performed by someone who has not had training, and should never be done with a piercing gun. Good placement and sound piercing techniques can make this a long-lived and enjoyable piercing choice. Consult your piercer with any questions you have regarding care and healing, and ask them what info you can pass along to your dentist to help them be more piercing-positive

Tongue Piercings

http://tongue-rings-guide.com/images/venom-tongue-piercing.jpg
Many facial piercings are more contemporary in nature, and the tongue piercing fall into this category as well. You don’t see this piercing in tribal cultures, you see it being worn by middle-class American college students, rock musicians and porn stars. For some people this is an easy piercing and for others it can be difficult. It takes a bit of forethought to have a comfortable tongue piercing.

Placement

Tongues are primarily pierced down the center, somewhere in mid-tongue, with a barbell being the primary style of jewelry worn in this piercing. What you wind up with is a small ball on the top and bottom of the tongue with the bar connecting them vertically through the middle of the tissue. Tongues are muscular and a lot of people say that biting your tongue accidentally with your teeth is more painful than piercing with a needle.

One very important factor to consider when getting your tongue pierced is the alignment of the jewelry and your teeth. The piercing should be set back far enough on the tongue to not be in constant contact with the backs of the teeth. Friction of the steel jewelry over time has been known to wear off enamel, and tongue piercees who like to “picket fence” their jewelry along the insides of their teeth will soon get reports of chipping and major damage from their dentists. Plastic balls on the ends of the barbells can greatly reduce chipping. Too far forward and your speech will be affected, the jewelry colliding with the teeth as the tongue makes certain vocal shapes in the front of the mouth.

Afterwards

One of the biggest factors for success is oral hygiene and healing routine. Your mouth has to be as healthy as it can and you have to be ready to take care of the piercing rather strictly for four to six weeks. The first week you have to be prepared to have your speech affected and to have eating border on hellish. Tongues swell up after piercing and you have to be ready to deal with this.

Healing is best if you plan for a starter piece of jewelry that is at least 1/4” longer than your tongue is thick. Talk with your body piercer about this. You will want to wear this barbell for the first two weeks or so until the swelling goes down in your tongue, then switch to a size that is more appropriate for not interfering with talking and eating over the long term. You will need to gargle several times a day in order to cleanse the piercing and your piercer will recommend which oral hygiene products to use. Sucking on ice is a basic way to help with swelling, but watch out as the barbell will get colder than the rest of the inside of your mouth.

Stretching Piercings


Stretching a piercing is a devotion, a meditation, a test of patience. It must be carried out slowly, as any deliberate modification of the body must be. Stretch too quickly and the piercing will become irritated and begin weeping lymph like a new piercing. A worse case scenario would result in a broken or torn piercing.

Wire thickness is sized much like women's clothing, except that the smaller the number, the larger the gauge. An average earring is 18 or 20 gauge. Any body piercing should be at least 14 gauge before beginning to stretch it, as anything thinner might rip into the surrounding tissue. Initial piercings can be up to 8 gauge, so if you know want really enlarged piercings, start as large as possible. Any metal jewelry should be surgical stainless steel, solid gold (at least 14 karat), or niobium, titanium, or platinum. Heavy monofilament nylon or inert plastic is also tolerable.

There are a few methods for producing a larger piercing. The first is weighting which merely entails hanging a heavier and heavier weight from the piercing. Care must be taken not to hang too much weight from too thin a ring. (Imagine a cheese slicer....) An example of the effect weighting produces can be seen in the Dyak women of Borneo. In their society, the longer the earlobe, the more it corresponds to their ideal of beauty. The lobes are pierced during childhood and progressively larger earrings are worn until a three-quarter inch wooden plug can fit. At this point, metal rings are hung from the lobes. These are slowly added to until the earlobes have stretched down to the collarbone.

If a larger piercing is desired without distending the ear (or other body part), the piercing can be enlarged by wearing progressively thicker jewelry. Many Jewish and Arab tribes women in ancient Afghanistan wore very thick, ornate earrings. The earrings were often attached to a headdress or shawl to support the weight of the jewelry, so the earlobe wouldn't be stretched into a loop.

Piercings can be slowly made larger by using a piece of special equipment called a "taper." This is a slim piece of metal, which is one gauge thickness on one end, and slowly tapers to one size larger by the other end. These can be slowly inserted into body piercings, using lubrication to help the skin friction, and the result is a one size increase. Jewelry of the next size up can then be inserted and piercings stabilized at the new size. Once they heal, the process can be repeated. If a piercing is "sized up" too quickly, the tissues can tear, and the piercing will have to be cared for as if it were brand-new all over again.

Removing A Piercing


Maybe it's for work. Maybe it's for school. It might be a visit to the parents or a wedding or who knows. Maybe this is a decision you've made, or maybe it's something you just have to deal with. Maybe it's for a little while or maybe you've changed your mind for good. But for whatever the reasons, the piecing is coming out.

Many people go into the idea of body piercing without a whole lot of forethought and without too much research into the matter, so this article is here to talk about what can happen when you take a body piercing out. Note that there is no set course of reactions or responses, more of a variety of potentials that can happen to an individual depending on their own body and the specific circumstances involved with their body piercing.

If the piercing isn't fully healed yet, the most likely outcome is that in a very short time, the piercing will collapse and start to heal shut. What this means is that the tissues will rejoin, closing the canal of the piercing and although they won't be fully healed shut, it can prevent the jewelry from being replaced. For some people and very new piercings, this can happen anywhere from instantly to just a few minutes. If you are thinking of getting pierced, and you can think of a definite situation in the next six months to a year where you'd absolutely have to take out the piercing, I'd advise that you just not get pierced, as you run a high risk of the hole closing from not being well-established.

For piercings that are past the estimated healing times, the reactions vary widely from person to person and piercing to piercing. The age of the piercing and type of body tissue pierced are big factors. The longer a piercing has been established, the greater the chances are that it will remain open, allowing the removed jewelry to be put back, but this isn't always the case. Some piercings can tighten up or shrink a bit when empty, a side effect that can't be predicted ahead of time. If you have to take out body jewelry due to a medical procedure, I suggest you try and replace the metal with something plastic/acrylic, as it's the removal of anything metallic on the body which is really what the doctors are trying to achieve.

If you no longer wish to have a body piercing, of course there's no worries about having to try and replace jewelry but some people get concerned about what sort of mark or hole might be left. Overall, thin piercings shrink down but don't entirely disappear. Think about when you watch movies and how many actors you can still see have or had pierced ears even when they aren't wearing earrings. Larger piercings will shrink but may remain much larger than average and stretched or gauged ear piercings might remain visibly open.

QuestionsNavel Piercings


My piercer told me I had granulation on the entrance hole of my navel. I was wearing a banana bell, which was too long, causing irritation. I changed to a shorter bar. It still has bad days, but nothing compared to what it used to, and the redness around the top hole is minimizing. I use sea salt soaks and vitamin c and echinachea. Do you have any tips on how to aid the healing process even more?

Often with navel piercings, too much is done to try and aid healing instead of letting the body take care of itself. When I first got my own navel pierced in the early 90s, there was an emphasis on medical grade cleansers, but now it’s shifted to gentle things like sea salt soaks. Make sure to clean any soap out of the piercing as that is frequently an irritant to the healing skin.

Also, having the jewelry fitted well to the piercing is key. If the jewelry is too long or too short, the friction or tension will often cause the piercing to form scar tissue, called a keloid. Making sure your clothing doesn’t rub the piercing is also important as that too can encourage keloids to form.

Is it possible to pierce an outie belly button? My friends say that I can pierce the bottom part but then it may look weird. What do you think?

I'm not an actual body piercer, but I do know piercing an outie belly button is very difficult and frequently, these piercing reject. Piercing can be done anywhere around the navel, the trick is if the piercing can be placed to not pushed on or crowded by the part of the tissue that forms the outie knob. If the jewelry gets rubbed too much, the piercing will reject (heal out) or it will form scar tissue (a keloid), neither of which most people want to experience.

I wouldn't recommend it, but if you really are curious, you should go talk to some piercers so that they can actually see your navel and give you their opinion.

How old you have to be to get pierced? I need to find somewhere that would let a 16 year old almost 17 year old get it done without a parent. My boyfriend who is 20 years old could go with me but I just don't want my mom to know.

Due to the large amount of teenagers trying to get pierced without their parents knowing, many states have now enacted very strict laws on teen piercing. Many of them now require not only ID from the adult, but the ID has to show proof of legal guardianship. Parents and grandparents who don’t have the same last names as their children have often found they cannot give permission. This has been the results of older boyfriends and girlfriends teens trying to pose as a permitting adult. Since these laws are set up state-by-state, you’ll have to do homework about the state you live in to find out what the local piercing rules are and who can give permission for you to be pierced.

Nose Piercing

http://upload.wikimedia.org/wikipedia/commons/6/68/Nose_piercing.jpg
One of the longest standing piercing modifications is the nose piercing. Studs and rings, worn both in the curve of the nostril or through the septum, between the two nostrils at the base of the nose, are found in cultures around the world. Brides in India can be seen with ornate gold rings connected to heavy matching earrings with ornate chains. Tribesmen in the deepest Amazon wear bones or bird feathers through enlarged septum piercings.

nose ring
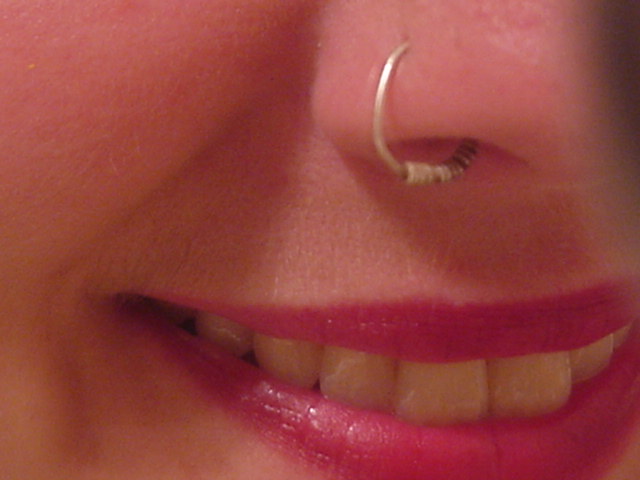
The most common place for piercing the nose is through the curve of one of the nostrils. Placement can be anywhere along the nostril, depending on the preference of the wearer. Usually a cork is inserted into the nostril to catch the needle end, and a straight needle is simply pushed thorough. It is important for people to find reputable piercers and not allow tools like ear piercing guns to be used. The reason that piercing guns should not be used for ANY form of piercing is that these tools are not sterlilized and this leaves them capable of transmission of body fluid-borne diseases and infections, including hepatitis and HIV.

Types of Nose Piercings

Nostril piercings are healed with either a stud-style piece of jewelry or a ring. Studs are kept in place either with small backings like stud earrings or a style of stud from India called a nostril screw. The short post ends in a half circle turn, so the jewelry screws in then pops down, staying in place. This old style has become very popular again due to its comfort and security.

The next most common placement for a nose piercing is through the septum, the piece of tissue that separates the two sides of the nose. It is important to avoid the main piece of cartilage in the end of the nose and to go thorough the softer tissue. Placement should also be considered when selecting ring-style jewelry so that the initial piercing is not placed too low. Most often a small ring is worn in this piercing. A U-shaped septum retainer can be worn by those who are healing new piercings, or who have to hide their septum piercing for work or familial-business. The ends are flipped up into the nose and the tiny wire becomes unseen, but keeps the piercing open. Barbells, tusks and spike-style jewelry are crafted for this piercing, but it is better to reserve these jewelry styles for established piercings or occasional wear.

Nostril and septum piercings can take between six and twelve weeks to heal. Maintaining general health and well-being during this time can both support and speed healing. Fresh piercings should have stainless surgical steel or 14k or 18k gold jewelry in them, with sterling silver being better for an established piercing. Changing pillow cases more often during the healing period and trying to avoid sleeping on the piercing are also advised

Nipple Piercing FAQ


Here are a few frequently asked questions about nipple piercings.

Q: I've had my nipple pierced for about several months now, and there is
some secretion of a whitish-yellow fluid ( not pus ) still coming out of it. Is this normal? If it's not, what can I do to make it stop ?


A: The whitish-yellow fluid is lymph fluid from the skin with some dead body cells in it and this is a normal by-product of the healing process. At five months, your nipples have probably healed a lot, but probably still are NOT all the way healed on the inside. Just keep gently cleaning this stuff off, esp if it dries on the rings. If any of the "crust" gets pulled inside, it's kinda ouchy.

Q: I have one pierced nipple and one not, and now the pierced one seems a little bit bigger than the one that is not pierced. Should I be worried if something bad is happening? ...cause it doesn't hurt and it's not red or anything. If I take the piercing out in the future, will my nipple heal and shrink back down to normal?


A: Piercing, for many people, stimulates tissue development in the nipples, especially if you are a woman who has not nursed a baby. Some men have gone from having almost no nipple to having nipples like gumdrops. I saw that happen one with a friend of mine. This too is totally normal. However, this is a permanent body change. How your nipple and/or aureola thickens or changes from being pierced is how it will stay for the rest of your life.

Q: Is there any real difference to wearing a ring or a barbell in a nipple piercing? Or do people just do whatever?

A: In my experiences, I've found two things that govern how people choose their nipple jewelry: lifestyle and personal preference. In the end, everyone settles down with whatever style of jewelry fits them comfortably, does not snag or interfere with whatever their daily activities are, and which the wearer finds aesthetically pleasing.

The variety of body jewelry has really expanded in the last twenty years. There are a lot of metals available, and then things like niobium and titanium come in lots of anodized colors. End caps on barbells or beads in captive rings can then be made from precious stones, be metal with insets or fancy pieces that disguise that the ring opens at all.

Nipple Piercing

One search term that has been consistently popular since the inception of the Internet is “nipple piercing.” There have been rumors of references to Roman centurions having pierced nipples to fasten their short dress capes, but in more recent interviews, many people have confessed that much modern piercing lore was invented or exaggerated by a piercing enthusiast named Doug Malloy. He is the one who introduced Jim Ward, founder of Gauntlet and Fakir Musafar, of Bodyplay magazine, and hosted "T&P (tattooing and piercing) socials" in the 70s. However the modern pierced nipple has grown in prominence and popularity much like the Internet where this topic leads picture and image search requests over the last decade.

male pierced nippleJust a decade ago, the mention of a nipple piercing often produced confused and shocked looks. Nowadays, the most common reaction is a knowing “oh..” and/or indifference. Pierced nipples are certainly not commonplace, but they have moved from the fringe underground to a secure position as part of modern pop culture. And this was before that fatal moment with Janet Jackson and a malfunctioning wardrobe. The site of a pop diva's pierced and adorned breast could only further cement the nipple as an object of fetish worship. Mainstream musicians sport nipple rings openly and erotic culture publications regularly include models with fetish body modifications like nose, nipple and navel rings.

Placement of nipple piercings is most often horizontally through the areola, just behind the main bud of the nipple. Sometimes this piercing is done vertically, either as a solo piercing or paired with a horizontal piercing. Thickness of the jewelry worn in a nipple piercing should be at least 14 gauge to avoid tissue tearing. Length or diameter of the jewelry is determined by how much tissue the piercing encompasses, and starter jewelry can be either a barbell or a ring. Fixed or captured bead rings are the most popular as they are secure to wear and easy to clean.

female pierced nippleNipple piercings can take between three and six months to heal on average, with many women finding it can take between six months and a year for their nipple piercings to heal. Men’s nipples heal faster due to differences in tissue composition and hormones. Many women experience extra issues with healing nipple piercings during their menstrual cycles. For women who are considering having children, so far there does not appear to be any interference between well-healed piercings and breast feeding, although it is not recommended to get new piercings before, during or after pregnancy due to changes of body state.

Once healed, many people with pierced nipples find the tissue more developed, with increased sensation and responsiveness. Men especially report increases in tissue thickness and tactile sensitivity. A variety of jewelry styles is available for wear in a well established piercing including curved barbells, horseshoe attachments and many variations for attaching chains and dangles.

Navel Piercing


What is it with Navel Rings?


Piercing lore has it that the Egyptian royal family had pierced belly buttons and wore gold rings in their navels, and that this was easily facilitated by the fact that they all had deep navels due to inbreeding. If that is true, then navel piercing has been around for a very long time. Even if it isn't true, there haven't been many occurrences of navel piercing in history, and it's clearly more of a modern body piercing than ear, nose or lip rings. Although highly aesthetic on many navels, this is a very difficult piercing to heal due to placement on the body.

The major physical qualification to getting your navel pierced is to have some sort of edge of extra tissue around your navel that can be clamped and pierced through. Nearly any form of any "inny" belly button will work, but some people with "outies" have enough of an edge too. You should not pierce through tissue that is protruding from inside the navel formation, only skin tissue that is around the bowl of the navel. Placement is most commonly somewhere between 11 o'clock and 1 o'clock but really any part will work if there is that definite flap of skin to go through. Comfort is best facilitated by placing the jewelry to work with the maximum depth of your belly button and how it sits as part of your overall abdomen. Trust your piercer, it's their job.

Life after your Navel is Pierced

navel piercingHealing is easily six to nine months with at least 50% of people finally healing after a full year or slightly longer. Your midsection is highly active in overall body movement, the tissue is very muscular and the blood supply to the surface skin is much less than other pierced areas on the body. Clothing can easily irritate this piercing, and many people dress more loosely or have to make sure the waistbands of their clothing don't rub the jewelry. Freshly pierced belly buttons are sensitive to many kinds of soaps and even antibiotic ointments and washes. With navels, less is more for cleansing and healing. Try to clean the piercing once in the morning and once at night, and don't play with it in between.

Once healed, there are a wide variety of captured bead rings, curved barbells, dangles and belly chains to wear. Navels are happy wearing surgical steel, gold, titanium and niobium. If you do sports or any kind of highly vigorous physical activity and your jewelry is in the way, you have a few options. One is to tape the ring down with a piece of first aid tape. Or you can take out the jewelry and temporarily replace it with a loop of nylon mono filament line of the appropriate thickness.

Male Body Piercings


The following piercings have mix of fact and fiction behind their names and placements, but they all have one thing in common. You must be possessing biological male anatomy to wear them. Men’s body piercing has much sexual innuendo around it, a mix of promised enhancement or implied virility.

However in modern piercing, reasons for any of these piercings is most likely a mix of personal reasoning. Given the intimate nature of the body parts being pierced, it is recommended that anyone wishing one of these do research not only on the history behind the piercing, but also into the skills and experience of the chosen body piercer.

Ampallang - Male genital piercing placed horizontally through the head of the penis, often also going through the urethra.

Apadravya - Male genital piercing vertical through the head of the penis. This piercing often also goes through the urethra.

Cleopatra - The name sometimes given to a “reverse” Prince Albert. The placement is similar to a PA, but done so as to align over the top of the penis.

Dydoe - Male genital piercing that are placed through the crown of the head of the penis. Most often small barbells are worn in these piercings.

Foreskin - The name for any piercing in the foreskin. Obviously, only uncircumcised males can have these piercings.

Frenum - Shaft skin piercing perpendicular to shaft just below the head of the penis. A ring or barbell can be worn in this piercing.

Guiche - Male genital piercing made in the flat area just behind the testicles. The placement most closely corresponds to the location of the first chakra discussed in Eastern healing systems.

Hafada - A piercing placed in the loose skin on the side of the testicular sack. Most often a ring is worn in this piercing. Sometimes this is called a scrotal piercing.

Prince Albert - Male genital piercing that goes through the shaft, just under the head, going through and exiting via the urethra. Despite many stories that Victorian consort Albert himself wore one of these piercings, there is no actual history record to confirm this. Nonetheless, this is one of the most popular modern-day men’s body piercings.

Trans-Scrotal Piercing - These rare and dangerous piercings run through the center of the scrotum, and result in a healed tunnel of skin that connects the outer surfaces of the skin. Infection rate is very high and should only be done by experienced piercers.

Whereas I can't host pictures here to further illustrate these piercings, I do have some I have hosted elsewhere. Mature viewers only, please.

Persons who decide to have such personal piercings done must also be prepared to interrupt their intimate life activities and allow for a period of healing, some of which can be weeks to months in length. Be sure to speak with your body piercer about aftercare BEFORE you get the piercing done and make sure you understand the proper way to care for your new piercing and for how long the care regime must be maintained.

How To Change A Captured Bead Ring

Here's a question I got recently on how best to change out a captured bead ring from a nose piercing. This style of jewelry works the same no matter what the type of piercing it's in, so really, this tutorial will work for any piercing with this type of ring.

"Hey...glad to find you here, we've got a question! My daughter has had her nose pierced for about 2 years. She has been wear nostril screws or L-bars but just a few days ago, she had her piercer put in a ring. It turns out she needs to be able to take the ring out for her job. In as much detail as possible, can you tell us how we should be doing this. It doesn't seem to come out very easily at all. The opening where the ball was doesn't allow enough space to get it off/out of her nose."

My answer:

You are correct the ring doesn't leave much room, but that's because that's the position it needs to be in to hold the ball. Captured bead rings get put in and out by bending the ring open. HOWEVER, make sure you do NOT bend the ring open by pulling the two ends away from each other so that the ring deforms into a U-shape! Or in other words, don't move the ends <-- [bead space] -->. You want to bend the ends away from each other in what I'd call north and south directions, so that the ring circle starts to have a bit of a spiral shape. This will make a much larger opening but not stress the metal as much. It also lets you line up the ends properly again to put the jewelry back in later.

There are two types of tools that can make dealing with captured bead rings easier. One is called ring spreaders, and these work opposite conventional pliers in that they open their jaws wider as you squeeze closed on the handles. These let you open the ring just the barest amount to capture or release the tightly-gripped bead. The other helpful tool is called O-ring pliers and they have curved tongs at the ends. These are use for reshaping and closing body rings into smooth circles. A perfectly round circle is more aesthetic and comfortable to wear.

Help For Unhappy Nose Piercings


I got my nose pierced about six months ago and it has not yet healed. I have days, some times weeks, when it feels fine and then out the blue it flares up. What can I do to get it to heal completely? Like right now my allergies have started acting up, and it has become sore and a little swollen. What suggestions do you have for a infected nose piercing?

Noses, like many cartilage piercings, can be notoriously long in healing. That type of tissue just does not get the good blood supply that softer tissues do. Piercings heal from the surface back towards the center of the piercing, growing a tunnel of new skin inside the hole to form a permanent piercing. If the surface is healed, the center of the piercing can still be an open wound, and this is often why piercings will go days or weeks and then react badly.

See if you can ease your care routine. Only use antibiotic ointments if you have an actual infection (increasing redness, tenderness, yellow-green discharge). Clean the piercing once in the morning and once at night with hot water and a very mild, natural soap (Dr. Bronner's is a good one). If the piercing seems to react to soap, try using just hot salt water. Allergy and skin medications can dry mucous membranes and irritate healing piercings so watch for a correlation between taking medications and flare ups. Try a bit of lotion around the piercing if the surface skin is really dried out. Again, look for a lotion that is natural, without scents or dyes as those too can increase irritation.

The reactions you describe are common to the healing process of a lot of body piercings. Try not to sleep on your piercing too much. In the summer, take extra care of your healing piercing. Watch out as piercings that aren’t completely healed can be irritated by sweat, sunscreen, sunburn and chemicals in pools and hot tubs.
You can now get an e-booklet on nose piercings. It contains more information on healing and aftercare (especially keloids), and a question and answer section based on email received at this site.

Flesh Hooks and Suspension

The recent Reuters headline ran “Kids dangle from meat hooks for fun” but in fact, this practice has roots that run deeper than that. A fusion of body piercing and spiritual practice, suspension and flesh hook pulls are slowly making a comeback in alternative communities. The ancient precedents for this type of behavior can be found in a variety of North American Indian tribes, or the religious practices of the Tamil of South Asia. These practices are tied to shamanism, as the effects of the great pain and stress on the body induces altered states.

suspensionThe Native American Sundance most often happened around the Summer Solstice. The best documented is the Sioux version, whereby dancers are pierced with wood or bone through the pectorals, with lines running to a tall pole. The dancers slowly pull, often for three or four days, until the piercing rips free. The gift of one’s own body is seen as being the greatest form of sacrifice to the gods.

The Tamils of South Asia have piercing practices are part of their worship of Murugan. Again you honor the god with your body and your offerings. The large frameworks of sharp spears, called kavandi, that devotees used to wear have been replaced in more modern times with hooks set into the skin of the back. Pulling against ropes, the worshippers walk for multiple miles to the temple site, their suffering an offering to the god along with being a sign of their devotion. Many also have a thin spike called a “vel,” symbolic of Murugan’s lance, pierced thru both cheeks or the tongue for the ceremony as well.

In the 1980s, Australian artist Stelarc did a series of suspensions in Japan whereby he hung by multiple hooks embedded in his flesh. These were staged at art galleries as formal artistic performances. One fascinating rigging involved rocks as counterbalances, so that the artist was suspended in a near-cross-legged position surrounded by a circle of floating rocks.

allen suspendedThese practices have been introduced to a much wider audience via the performances and presentations of Fakir Musafar. Considered the “Father of the Modern Primitive movement” this 74-year-old has engaged in just about every kind of body modification known to mankind, and being a photographer, has well-documented his experiments and experiences over the years. Thru his seminal 90s publication bodyplay, Musafar covered not only the history of many of these rites, but showed ways to adapt them for modern neo-pagan spirituality. He has led public and private ceremonies, incorporating ball dances, flesh hooks and the act of bearing kavandi into performances and group rituals worldwide.

hooksTexas-based Traumatic Stress Discipline has taken hook hangs and pulls and staged performances nationally and internationally. One of the founding members, Allen Falkner, performed at the San Francisco Fetish Ball in 2003 where I took the pictures that accompany this article. Speaking to him at the opening party the night before, he mentioned how people upset with this style of performance had filed legal motions attempting to stop the group, but that the judge in the case had ruled the performances “body art” and saw no grounds that would make them illegal.

flesh hooksIn the recent encounter in Islamorada, FL, law officials called to the scene were surprised to find a group of young people doing a hook hang via a bamboo tripod erected near the water’s edge but admitted that no laws were being broken. One of the best lines in the article said that according to authorities, the girl hanging from the tripod when sheriff's and Coast Guard officers arrived “did not seem to mind the hooks.” For such practices, modern piercing techniques are used, and many observers are often surprised there is little or no blood. Despite the personal objections of whomever called the police, no laws were being broken and no citations or legal actions were taken
Freelance Jobs